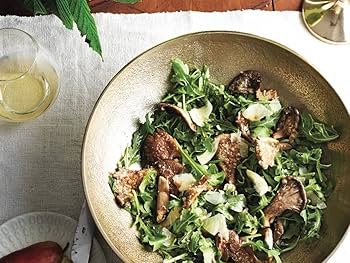
Vegan Caesar Salad featuring Oyster Mushrooms
### Vegan Caesar Salad with Sear-Crisped Mushrooms
As summer gives way to autumn, it becomes an ideal moment to delve into fresh and innovative recipes. This article introduces a delightful vegan reinterpretation of the classic Caesar salad, featuring a distinctive method of preparing mushrooms that takes the dish to elevated levels.
#### A New Home and New Recipes
Following a substantial relocation to Denmark, the recipe creators, David and Luise, are acclimating to their new environment while continuing to share their enthusiasm for plant-based cuisine. With Luise immersed in her midwife internship and David launching a Green Kitchen Studio in Copenhagen, they are navigating the upheaval of change while presenting appetizing vegan recipes to their followers.
#### The Star of the Dish: Sear-Crisped Mushrooms
The centerpiece of this recipe is the mushrooms, which are cooked using an inventive approach that involves compressing them between two pans on medium-high heat. This technique enables the mushrooms to release their inherent juices while achieving a delightfully crunchy crust. The method, attributed to Derek Sarno, produces mushrooms that are both crispy and succulent, evoking the texture of chicken.
To prepare the mushrooms:
1. Heat two pans on medium-high heat.
2. Place the mushrooms between the pans and apply pressure.
3. Cook until they attain a golden, crispy exterior.
4. Marinate the mushrooms to enhance their flavor.
This preparation not only improves the mushrooms’ texture but also makes them a key element of the salad.
#### The Vegan Caesar Dressing
Instead of the conventional Caesar dressing, which commonly contains anchovies, this recipe features a straightforward yet tasty vegan substitute. The dressing includes:
– Vegan mayonnaise
– A dash of vinegar
– Capers for a tangy punch
This blend results in a creamy dressing that perfectly complements the crisp romaine lettuce.
#### Assembling the Salad
To put together the vegan Caesar salad:
1. Toss fresh romaine lettuce with the vegan dressing until well coated.
2. Top with the sear-crisped mushrooms.
3. For extra texture and nutrition, warm chickpeas can be added in lieu of croutons.
This salad is not only visually stunning but also brimming with flavor and nutrients, making it a fulfilling meal.
#### Conclusion
This vegan Caesar salad with sear-crisped mushrooms exemplifies the adaptability of plant-based cooking. It’s a dish that highlights the remarkable texture and flavor of mushrooms while offering a fresh perspective on a cherished classic. Whether you seek a quick lunch or a side dish for dinner, this salad is guaranteed to impress. Try it out and share your thoughts on this scrumptious meal!
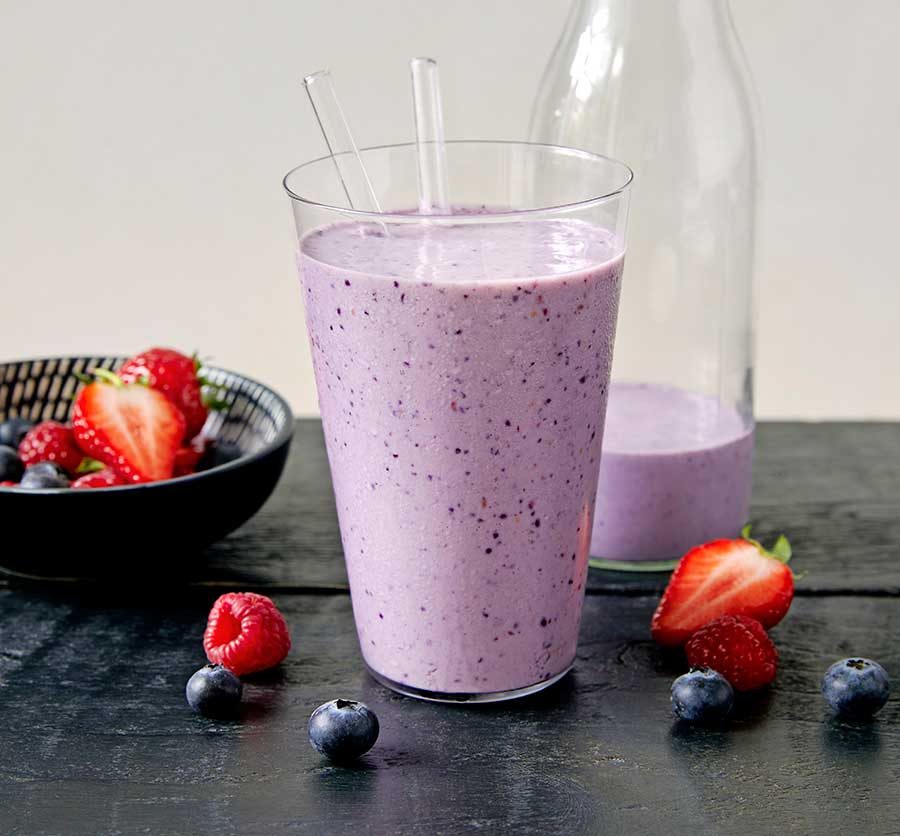
How to Create the Ideal Berry Smoothie
Alex & Sonja: The Culinary Team Behind A Couple Cooks
Introducing Alex and Sonja Overhiser, the energetic pair who have turned their love for cooking into a flourishing online culinary hub. As authors of two well-received cookbooks and the creators of the beloved website A Couple Cooks, Alex and Sonja have been expressing their passion for straightforward, seasonal recipes since 2010. Their adventure began with a mutual desire to whip up delightful meals and has developed into an extensive platform featuring thousands of unique recipes, cooking tips, and meal planning suggestions.
Their cooking philosophy is firmly anchored in the pleasure of preparing meals side by side. As busy parents, they recognize the difficulties of juggling family obligations with culinary innovation. This real-life couple not only cooks together but also works collaboratively on all facets of their website, from writing to photography, ensuring that each recipe is thoughtfully developed and visually striking. Their recipes undergo testing not just by them but also by their children, adding an extra dimension of authenticity and family-friendliness to their offerings.
The A Couple Cooks website showcases Alex and Sonja’s dedication to making cooking attainable and enjoyable for all. They emphasize the use of fresh, seasonal ingredients to craft dishes that are both healthy and flavorful. Their recipe selection spans from quick weeknight meals to grand weekend celebrations, appealing to a diverse array of tastes and dietary requirements.
Alongside their vast recipe archive, Alex and Sonja share useful cooking tips and meal planning ideas, assisting home cooks in optimizing their kitchen practices and maximizing their time and ingredients. Their knowledge and friendly approach have built a devoted readership that values their practical guidance and motivating culinary innovations.
Through their cookbooks and digital presence, Alex and Sonja Overhiser continue to encourage others to relish the joy of cooking, one recipe at a time. Whether you are an experienced chef or a beginner in the kitchen, A Couple Cooks provides a treasure trove of resources to help you uncover the joys of preparing and sharing delectable meals with family and friends.
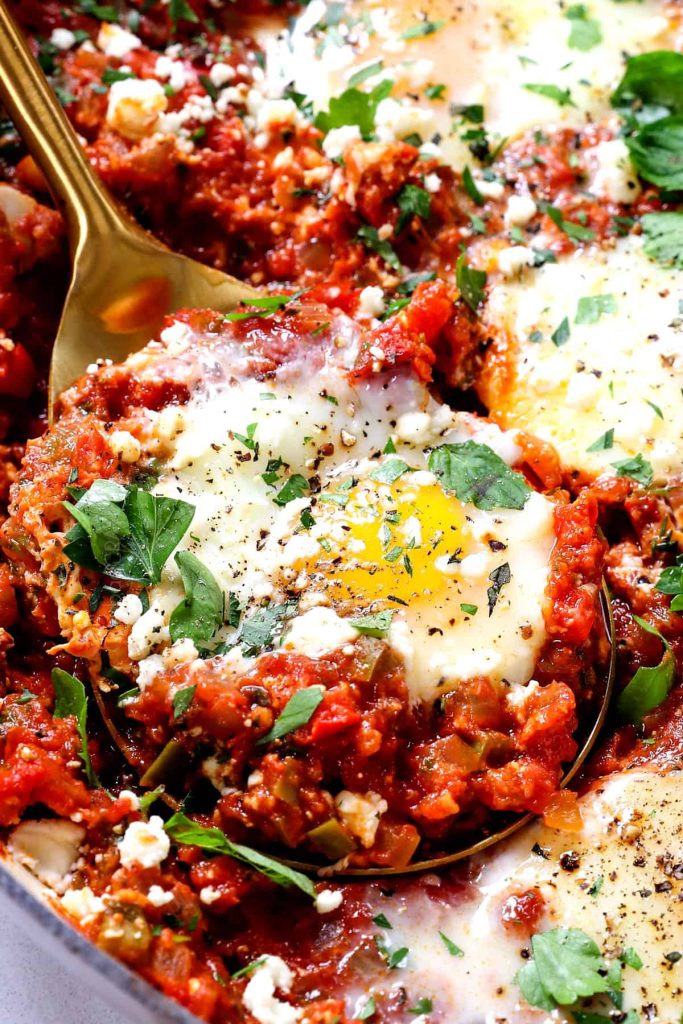
Sweet Potato Shakshuka: A Wholesome Variation of the Traditional Recipe
### Sweet Potato and Egg Skillet with Sriracha Butter
**Introduction**
This charming recipe, taken from *Ottolenghi Test Kitchen: Shelf Love* by Noor Murad and Yotam Ottolenghi, merges the natural sweetness of roasted sweet potatoes with the luxuriousness of eggs and a spicy flair from sriracha butter. Ideal for a cozy brunch or a fulfilling dinner, this dish offers both comfort and taste.
**Ingredients**
– Sweet potatoes
– Olive oil
– Cheddar cheese
– Garlic
– Cumin
– Eggs
– Butter
– Sriracha
– Onion
– Lemon juice
– Fresh coriander
– Salt and pepper
**Instructions**
1. **Prepare the Sweet Potatoes**: Preheat your oven to 200°C (400°F fan). Prick the sweet potatoes with a fork around 8–10 times and arrange them on a parchment-lined baking sheet. Bake for 45–50 minutes until fully cooked and soft. Once finished, allow them to cool and lower the oven temperature to 180°C fan (375°F).
2. **Pickle the Onions**: In a small bowl, mix the chopped onion with 1 tablespoon of lemon juice and a pinch of salt. Set this blend aside to pickle while you prep the remainder of the dish.
3. **Prepare the Potato Skins**: After the sweet potatoes have cooled, peel the skins and break them into approximately 4 cm pieces. Place the flesh in a large bowl. Return the skins to the baking sheet, toss them with 1 tablespoon of oil, 1/4 teaspoon of salt, and a good grind of pepper. Bake for about 8 minutes until they are nicely colored and beginning to crisp up. Set aside to cool.
4. **Mash the Potato Flesh**: Use a fork to mash the sweet potato flesh until it is smooth. Incorporate the cheddar cheese, minced garlic, cumin, another tablespoon of oil, the remaining tablespoon of lemon juice, 1 teaspoon of salt, and a generous grind of pepper. Stir until well combined.
5. **Cook the Potato Mixture**: Heat 1 tablespoon of oil in a large frying pan with a lid over medium-high heat. Spoon the mashed potato mixture into the pan, spreading it out evenly. Cook for about 7 minutes until the bottom begins to color. Lower the heat to medium and create eight wells in the potato mixture, cracking an egg into each well. Lightly sprinkle with salt and pepper, cover with the lid, and cook for 4–5 minutes, rotating the pan occasionally, until the egg whites are set but the yolks stay runny.
6. **Make the Sriracha Butter**: In a small saucepan, combine the butter and sriracha over medium heat. Whisk continuously until the butter melts and the mixture emulsifies. Remove from heat before it starts to bubble to avoid splitting.
7. **Serve**: Once the eggs are cooked, drizzle the sriracha butter over them. Finish with a generous handful of crispy potato skins, half of the pickled onions, and all the fresh coriander leaves. Serve immediately, alongside the extra potato skins and pickled onions.
**Conclusion**
This Sweet Potato and Egg Skillet with Sriracha Butter exemplifies how simple ingredients can coalesce to create a dish that is both appetizing and full of flavor. Savor this recipe as a comforting meal any time throughout the day!

Double Chocolate and Buckwheat Biscuits Recipe by Aran
### Vegan Chocolate Fennel Cookies Recipe
This plant-based version of Aran Goyoaga’s classic chocolate fennel cookie recipe presents a charming spin on conventional baking. By replacing eggs with aquafaba and butter with coconut oil, these cookies preserve their luscious taste while being completely vegan. Here’s a guide to crafting these mouthwatering delights.
#### Ingredients
– 6 tablespoons aquafaba (whipped)
– 7 ounces (200 g) dark chocolate (dairy-free)
– 1/4 cup almond butter
– 1/4 cup coconut oil (melted)
– 3/4 cup brown sugar
– 1 teaspoon vanilla extract
– 1 cup buckwheat flour
– 1/4 cup cocoa powder
– 1/2 teaspoon baking soda
– 1/4 teaspoon salt
– 1 ounce (25 g) dark chocolate (for topping)
– 1 teaspoon fennel seeds (crushed)
#### Instructions
1. **Preheat the Oven**: Set your oven to 375 degrees F (190 degrees C). Line two baking trays with parchment paper.
2. **Prepare Fennel**: Grind the fennel seeds into a powder using a mortar and pestle or a clean coffee grinder.
3. **Melt Chocolate Mixture**: In a medium pot, fill it one-quarter with water and bring it to a gentle simmer over medium-high heat. In a large heat-safe bowl, combine the crushed fennel, 7 ounces of dark chocolate, almond butter, and melted coconut oil. Set the bowl over the simmering water and stir until the chocolate is almost melted. Remove from heat; the remaining heat will complete the melting of the chocolate.
4. **Mix Aquafaba and Sugar**: In the bowl of a stand mixer fitted with the whisk attachment, blend the whipped aquafaba, brown sugar, and vanilla extract. Beat on high until the mixture is light and thick, approximately 5 minutes. Then, add the melted chocolate mixture and mix on medium speed until thick, around 1 minute.
5. **Combine Dry Ingredients**: In a small bowl, whisk together the buckwheat flour, cocoa powder, baking soda, and salt. Gently fold this dry mix into the wet batter with a spatula.
6. **Shape Cookies**: Drop 1½-tablespoon mounds of dough onto each prepared baking tray, ensuring about 2 inches of space between each mound. Lightly press small pieces of the remaining dark chocolate on top of each cookie.
7. **Bake**: Bake in the preheated oven for 8 to 9 minutes, until the edges are crispy but the centers remain soft. Be careful not to overbake; they may seem slightly underbaked but will firm up as they cool.
8. **Cool and Store**: Let the cookies cool on the pan for about 10 minutes or until they can be lifted without crumbling. Store the cookies in an airtight container, where they will remain fresh for up to 3 days.
These vegan chocolate fennel cookies are a wonderful combination of rich chocolate and fragrant fennel, adding a distinctive touch to your baking collection. Savor the delightful flavors while enjoying a guilt-free indulgence!

Saffron and Millet Salad for Winter Festivities
### Roasted Root Vegetable and Millet Salad with Pomegranate
This colorful and wholesome vegan recipe merges the robust flavors of roasted root vegetables with the chewy texture of millet, garnished with fresh herbs and pomegranate seeds for a splash of color and taste. Ideal as a main dish or a substantial side, this salad is both delightful and eye-catching.
#### Ingredients
– Variety of root vegetables (carrots, parsnips, sweet potatoes, etc.)
– Olive oil
– Ground cinnamon
– Salt
– Pecan nuts
– Millet
– Water
– Vegetable broth
– Saffron
– Pink Castel Franco lettuce (or any preferred lettuce)
– Fresh dill and mint
– Pomegranate seeds
#### Instructions
1. **Preheat the Oven**: Start by setting your oven to 400°F (200°C).
2. **Prepare the Root Vegetables**: Peel and chop your selected root vegetables into chunks.
3. **Season and Bake**: Arrange the vegetable chunks on a baking tray lined with parchment paper. Drizzle with olive oil, season with cinnamon and salt, then toss to coat evenly. Roast in the preheated oven for 15 to 20 minutes, or until the vegetables are tender, golden, and the edges are slightly crispy.
4. **Roast the Nuts**: In the final moments of baking, add the pecan nuts to the tray to roast with the root vegetables, enhancing their flavor and crunch.
5. **Cook the Millet**: As the vegetables roast, prepare the millet. In a saucepan, combine millet, water, vegetable broth, and saffron. Bring it to a boil, then reduce the heat and let it simmer for 8 minutes. After cooking, turn off the heat, cover the pot, and allow it to sit for approximately 10 minutes to help the millet fluff.
6. **Assemble the Salad**: Once the millet is done, move it to a serving platter and let it cool slightly. Remove the roasted vegetables and nuts from the oven and let them cool for a few moments.
7. **Prepare the Dressing**: In a small bowl, combine your selected dressing ingredients (such as olive oil, lemon juice, and herbs) and drizzle over the roasted roots.
8. **Combine Ingredients**: Halve the pink Castel Franco lettuce and gently mix it into the cooled millet. Incorporate the roasted roots and pecans into the mixture.
9. **Garnish**: Sprinkle the chopped dill and mint over the salad, followed by a generous scattering of pomegranate seeds for a refreshing crunch and sweetness.
10. **Serve**: This dish can be enjoyed warm or at room temperature. For those adding a creamy touch, crumbled feta cheese can be sprinkled on top, though it is completely optional for a vegan version.
Savor this delightful and nutritious roasted root vegetable and millet salad as a wholesome meal that highlights the seasonal flavors!
Vegan Caesar Salad featuring Oyster Mushrooms
### Vegan Caesar Salad with Sear-Crisped Mushrooms
As summer gives way to autumn, it becomes an ideal moment to delve into fresh and innovative recipes. This article introduces a delightful vegan reinterpretation of the classic Caesar salad, featuring a distinctive method of preparing mushrooms that takes the dish to elevated levels.
#### A New Home and New Recipes
Following a substantial relocation to Denmark, the recipe creators, David and Luise, are acclimating to their new environment while continuing to share their enthusiasm for plant-based cuisine. With Luise immersed in her midwife internship and David launching a Green Kitchen Studio in Copenhagen, they are navigating the upheaval of change while presenting appetizing vegan recipes to their followers.
#### The Star of the Dish: Sear-Crisped Mushrooms
The centerpiece of this recipe is the mushrooms, which are cooked using an inventive approach that involves compressing them between two pans on medium-high heat. This technique enables the mushrooms to release their inherent juices while achieving a delightfully crunchy crust. The method, attributed to Derek Sarno, produces mushrooms that are both crispy and succulent, evoking the texture of chicken.
To prepare the mushrooms:
1. Heat two pans on medium-high heat.
2. Place the mushrooms between the pans and apply pressure.
3. Cook until they attain a golden, crispy exterior.
4. Marinate the mushrooms to enhance their flavor.
This preparation not only improves the mushrooms’ texture but also makes them a key element of the salad.
#### The Vegan Caesar Dressing
Instead of the conventional Caesar dressing, which commonly contains anchovies, this recipe features a straightforward yet tasty vegan substitute. The dressing includes:
– Vegan mayonnaise
– A dash of vinegar
– Capers for a tangy punch
This blend results in a creamy dressing that perfectly complements the crisp romaine lettuce.
#### Assembling the Salad
To put together the vegan Caesar salad:
1. Toss fresh romaine lettuce with the vegan dressing until well coated.
2. Top with the sear-crisped mushrooms.
3. For extra texture and nutrition, warm chickpeas can be added in lieu of croutons.
This salad is not only visually stunning but also brimming with flavor and nutrients, making it a fulfilling meal.
#### Conclusion
This vegan Caesar salad with sear-crisped mushrooms exemplifies the adaptability of plant-based cooking. It’s a dish that highlights the remarkable texture and flavor of mushrooms while offering a fresh perspective on a cherished classic. Whether you seek a quick lunch or a side dish for dinner, this salad is guaranteed to impress. Try it out and share your thoughts on this scrumptious meal!
Read More
How to Create the Ideal Berry Smoothie
Alex & Sonja: The Culinary Team Behind A Couple Cooks
Introducing Alex and Sonja Overhiser, the energetic pair who have turned their love for cooking into a flourishing online culinary hub. As authors of two well-received cookbooks and the creators of the beloved website A Couple Cooks, Alex and Sonja have been expressing their passion for straightforward, seasonal recipes since 2010. Their adventure began with a mutual desire to whip up delightful meals and has developed into an extensive platform featuring thousands of unique recipes, cooking tips, and meal planning suggestions.
Their cooking philosophy is firmly anchored in the pleasure of preparing meals side by side. As busy parents, they recognize the difficulties of juggling family obligations with culinary innovation. This real-life couple not only cooks together but also works collaboratively on all facets of their website, from writing to photography, ensuring that each recipe is thoughtfully developed and visually striking. Their recipes undergo testing not just by them but also by their children, adding an extra dimension of authenticity and family-friendliness to their offerings.
The A Couple Cooks website showcases Alex and Sonja’s dedication to making cooking attainable and enjoyable for all. They emphasize the use of fresh, seasonal ingredients to craft dishes that are both healthy and flavorful. Their recipe selection spans from quick weeknight meals to grand weekend celebrations, appealing to a diverse array of tastes and dietary requirements.
Alongside their vast recipe archive, Alex and Sonja share useful cooking tips and meal planning ideas, assisting home cooks in optimizing their kitchen practices and maximizing their time and ingredients. Their knowledge and friendly approach have built a devoted readership that values their practical guidance and motivating culinary innovations.
Through their cookbooks and digital presence, Alex and Sonja Overhiser continue to encourage others to relish the joy of cooking, one recipe at a time. Whether you are an experienced chef or a beginner in the kitchen, A Couple Cooks provides a treasure trove of resources to help you uncover the joys of preparing and sharing delectable meals with family and friends.
Read More
Sweet Potato Shakshuka: A Wholesome Variation of the Traditional Recipe
### Sweet Potato and Egg Skillet with Sriracha Butter
**Introduction**
This charming recipe, taken from *Ottolenghi Test Kitchen: Shelf Love* by Noor Murad and Yotam Ottolenghi, merges the natural sweetness of roasted sweet potatoes with the luxuriousness of eggs and a spicy flair from sriracha butter. Ideal for a cozy brunch or a fulfilling dinner, this dish offers both comfort and taste.
**Ingredients**
– Sweet potatoes
– Olive oil
– Cheddar cheese
– Garlic
– Cumin
– Eggs
– Butter
– Sriracha
– Onion
– Lemon juice
– Fresh coriander
– Salt and pepper
**Instructions**
1. **Prepare the Sweet Potatoes**: Preheat your oven to 200°C (400°F fan). Prick the sweet potatoes with a fork around 8–10 times and arrange them on a parchment-lined baking sheet. Bake for 45–50 minutes until fully cooked and soft. Once finished, allow them to cool and lower the oven temperature to 180°C fan (375°F).
2. **Pickle the Onions**: In a small bowl, mix the chopped onion with 1 tablespoon of lemon juice and a pinch of salt. Set this blend aside to pickle while you prep the remainder of the dish.
3. **Prepare the Potato Skins**: After the sweet potatoes have cooled, peel the skins and break them into approximately 4 cm pieces. Place the flesh in a large bowl. Return the skins to the baking sheet, toss them with 1 tablespoon of oil, 1/4 teaspoon of salt, and a good grind of pepper. Bake for about 8 minutes until they are nicely colored and beginning to crisp up. Set aside to cool.
4. **Mash the Potato Flesh**: Use a fork to mash the sweet potato flesh until it is smooth. Incorporate the cheddar cheese, minced garlic, cumin, another tablespoon of oil, the remaining tablespoon of lemon juice, 1 teaspoon of salt, and a generous grind of pepper. Stir until well combined.
5. **Cook the Potato Mixture**: Heat 1 tablespoon of oil in a large frying pan with a lid over medium-high heat. Spoon the mashed potato mixture into the pan, spreading it out evenly. Cook for about 7 minutes until the bottom begins to color. Lower the heat to medium and create eight wells in the potato mixture, cracking an egg into each well. Lightly sprinkle with salt and pepper, cover with the lid, and cook for 4–5 minutes, rotating the pan occasionally, until the egg whites are set but the yolks stay runny.
6. **Make the Sriracha Butter**: In a small saucepan, combine the butter and sriracha over medium heat. Whisk continuously until the butter melts and the mixture emulsifies. Remove from heat before it starts to bubble to avoid splitting.
7. **Serve**: Once the eggs are cooked, drizzle the sriracha butter over them. Finish with a generous handful of crispy potato skins, half of the pickled onions, and all the fresh coriander leaves. Serve immediately, alongside the extra potato skins and pickled onions.
**Conclusion**
This Sweet Potato and Egg Skillet with Sriracha Butter exemplifies how simple ingredients can coalesce to create a dish that is both appetizing and full of flavor. Savor this recipe as a comforting meal any time throughout the day!
Read More
Double Chocolate and Buckwheat Biscuits Recipe by Aran
### Vegan Chocolate Fennel Cookies Recipe
This plant-based version of Aran Goyoaga’s classic chocolate fennel cookie recipe presents a charming spin on conventional baking. By replacing eggs with aquafaba and butter with coconut oil, these cookies preserve their luscious taste while being completely vegan. Here’s a guide to crafting these mouthwatering delights.
#### Ingredients
– 6 tablespoons aquafaba (whipped)
– 7 ounces (200 g) dark chocolate (dairy-free)
– 1/4 cup almond butter
– 1/4 cup coconut oil (melted)
– 3/4 cup brown sugar
– 1 teaspoon vanilla extract
– 1 cup buckwheat flour
– 1/4 cup cocoa powder
– 1/2 teaspoon baking soda
– 1/4 teaspoon salt
– 1 ounce (25 g) dark chocolate (for topping)
– 1 teaspoon fennel seeds (crushed)
#### Instructions
1. **Preheat the Oven**: Set your oven to 375 degrees F (190 degrees C). Line two baking trays with parchment paper.
2. **Prepare Fennel**: Grind the fennel seeds into a powder using a mortar and pestle or a clean coffee grinder.
3. **Melt Chocolate Mixture**: In a medium pot, fill it one-quarter with water and bring it to a gentle simmer over medium-high heat. In a large heat-safe bowl, combine the crushed fennel, 7 ounces of dark chocolate, almond butter, and melted coconut oil. Set the bowl over the simmering water and stir until the chocolate is almost melted. Remove from heat; the remaining heat will complete the melting of the chocolate.
4. **Mix Aquafaba and Sugar**: In the bowl of a stand mixer fitted with the whisk attachment, blend the whipped aquafaba, brown sugar, and vanilla extract. Beat on high until the mixture is light and thick, approximately 5 minutes. Then, add the melted chocolate mixture and mix on medium speed until thick, around 1 minute.
5. **Combine Dry Ingredients**: In a small bowl, whisk together the buckwheat flour, cocoa powder, baking soda, and salt. Gently fold this dry mix into the wet batter with a spatula.
6. **Shape Cookies**: Drop 1½-tablespoon mounds of dough onto each prepared baking tray, ensuring about 2 inches of space between each mound. Lightly press small pieces of the remaining dark chocolate on top of each cookie.
7. **Bake**: Bake in the preheated oven for 8 to 9 minutes, until the edges are crispy but the centers remain soft. Be careful not to overbake; they may seem slightly underbaked but will firm up as they cool.
8. **Cool and Store**: Let the cookies cool on the pan for about 10 minutes or until they can be lifted without crumbling. Store the cookies in an airtight container, where they will remain fresh for up to 3 days.
These vegan chocolate fennel cookies are a wonderful combination of rich chocolate and fragrant fennel, adding a distinctive touch to your baking collection. Savor the delightful flavors while enjoying a guilt-free indulgence!
Read More
Saffron and Millet Salad for Winter Festivities
### Roasted Root Vegetable and Millet Salad with Pomegranate
This colorful and wholesome vegan recipe merges the robust flavors of roasted root vegetables with the chewy texture of millet, garnished with fresh herbs and pomegranate seeds for a splash of color and taste. Ideal as a main dish or a substantial side, this salad is both delightful and eye-catching.
#### Ingredients
– Variety of root vegetables (carrots, parsnips, sweet potatoes, etc.)
– Olive oil
– Ground cinnamon
– Salt
– Pecan nuts
– Millet
– Water
– Vegetable broth
– Saffron
– Pink Castel Franco lettuce (or any preferred lettuce)
– Fresh dill and mint
– Pomegranate seeds
#### Instructions
1. **Preheat the Oven**: Start by setting your oven to 400°F (200°C).
2. **Prepare the Root Vegetables**: Peel and chop your selected root vegetables into chunks.
3. **Season and Bake**: Arrange the vegetable chunks on a baking tray lined with parchment paper. Drizzle with olive oil, season with cinnamon and salt, then toss to coat evenly. Roast in the preheated oven for 15 to 20 minutes, or until the vegetables are tender, golden, and the edges are slightly crispy.
4. **Roast the Nuts**: In the final moments of baking, add the pecan nuts to the tray to roast with the root vegetables, enhancing their flavor and crunch.
5. **Cook the Millet**: As the vegetables roast, prepare the millet. In a saucepan, combine millet, water, vegetable broth, and saffron. Bring it to a boil, then reduce the heat and let it simmer for 8 minutes. After cooking, turn off the heat, cover the pot, and allow it to sit for approximately 10 minutes to help the millet fluff.
6. **Assemble the Salad**: Once the millet is done, move it to a serving platter and let it cool slightly. Remove the roasted vegetables and nuts from the oven and let them cool for a few moments.
7. **Prepare the Dressing**: In a small bowl, combine your selected dressing ingredients (such as olive oil, lemon juice, and herbs) and drizzle over the roasted roots.
8. **Combine Ingredients**: Halve the pink Castel Franco lettuce and gently mix it into the cooled millet. Incorporate the roasted roots and pecans into the mixture.
9. **Garnish**: Sprinkle the chopped dill and mint over the salad, followed by a generous scattering of pomegranate seeds for a refreshing crunch and sweetness.
10. **Serve**: This dish can be enjoyed warm or at room temperature. For those adding a creamy touch, crumbled feta cheese can be sprinkled on top, though it is completely optional for a vegan version.
Savor this delightful and nutritious roasted root vegetable and millet salad as a wholesome meal that highlights the seasonal flavors!
Read More
Sautéed Rice with Prawns and Veggies
**How to Store and Reheat Leftover Shrimp Fried Rice**
Shrimp fried rice is a tasty meal that blends the flavorful taste of shrimp with the enjoyable texture of fried rice. Although it’s best consumed fresh, there are occasions when you may have some leftover. Luckily, leftover shrimp fried rice can be stored and reheated properly, allowing you to savor it even days after it was initially prepared.
**Storing Leftover Shrimp Fried Rice**
When keeping leftover shrimp fried rice, it’s essential to use an airtight container to preserve its freshness and fend off any undesirable odors from entering. Place the container in the refrigerator, where it can last for up to three days. This storage technique aids in retaining the dish’s flavors and textures, making it a convenient choice for a quick meal later in the week.
**Reheating Leftover Shrimp Fried Rice**
Reheating shrimp fried rice can be done successfully on the stovetop. For this, use a large skillet and place it over medium heat. Add a bit of oil to the skillet to avoid the rice sticking and to help regain some of the moisture lost during refrigeration. Stir the rice gently for a few minutes until it is warmed through. This method not only heats the rice but also helps in keeping its original texture and flavor.
**Avoid Freezing Shrimp Fried Rice**
While freezing is a typical method for preserving leftovers, it is not advisable for shrimp fried rice. Freezing may cause the shrimp to turn rubbery once thawed, which can compromise the overall quality of the dish. For optimal taste and texture, it’s best to enjoy the shrimp fried rice within the three-day refrigeration timeframe.
In summary, leftover shrimp fried rice is a flexible dish that can be stored and reheated easily. By adhering to these straightforward steps, you can relish this delectable meal even after it has been kept in the fridge. Just keep in mind to steer clear of freezing to maintain the shrimp’s texture.
Read More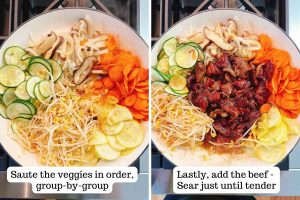
One-Pan Bibimbap with Ground Beef and Veggies
**One-Pan Bibimbap with Ground Beef and Veggies: A Fast and Tasty Treat**
Bibimbap, an iconic Korean specialty, is famous for its colorful appearance and delightful flavor combination. Typically served as a bowl of warm white rice adorned with sautéed vegetables, chili pepper paste, soy sauce, and a fried egg, bibimbap is a feast that pleases both the eyes and the taste buds. For those wanting a swifter and more convenient option that doesn’t compromise on flavor, the one-pan bibimbap with ground beef and veggies is a perfect alternative.
**Ingredients:**
– 1 pound ground beef
– 2 tablespoons sesame oil
– 3 cloves garlic, minced
– 1 tablespoon ginger, minced
– 1 zucchini, julienned
– 1 carrot, julienned
– 1 cup spinach leaves
– 1 cup bean sprouts
– 2 cups cooked rice
– 2 tablespoons soy sauce
– 1 tablespoon gochujang (Korean chili paste)
– 1 tablespoon rice vinegar
– 1 teaspoon sugar
– 4 eggs
– Sesame seeds and sliced green onions for garnish
**Instructions:**
1. **Prepare the Pan:** Heat a large pan over medium-high heat. Add 1 tablespoon of sesame oil and sauté the minced garlic and ginger until aromatic.
2. **Cook the Beef:** Incorporate the ground beef into the pan. Cook until browned, breaking it apart with a spatula. When done, drain any excess fat.
3. **Sauté the Veggies:** Move the beef to one side of the pan. Add the remaining sesame oil and sauté the zucchini, carrot, spinach, and bean sprouts until tender-crisp. Combine the vegetables with the beef.
4. **Season the Mixture:** In a small bowl, combine the soy sauce, gochujang, rice vinegar, and sugar. Pour this sauce over the beef and vegetable mixture, stirring well to mix.
5. **Add the Rice:** Gently fold in the cooked rice, ensuring it is evenly coated with the sauce and blended thoroughly with the beef and vegetables.
6. **Fry the Eggs:** In another non-stick pan, fry the eggs sunny-side up. The runny yolk will provide richness to the dish.
7. **Assemble and Serve:** Portion the bibimbap mixture into serving bowls. Top each with a fried egg. Garnish with sesame seeds and sliced green onions.
**Nutritional Benefits:**
This one-pan bibimbap is not only quick to make but also rich in nutrients. Ground beef serves as a superb source of protein and iron, while the variety of vegetables offers vitamins, minerals, and fiber. The addition of gochujang brings a spicy flair, boosting metabolism and supplying antioxidants.
**Conclusion:**
One-pan bibimbap with ground beef and veggies is a delightful reinterpretation of a classic Korean meal, providing a combination of flavors and textures in an easy-to-prepare format. Ideal for hectic weeknights, this dish delivers the essence of Korean cuisine to your table with minimal hassle and maximum flavor. Savor the medley of tastes and enjoy the comfort of a home-cooked meal with this quick bibimbap recipe.
Read More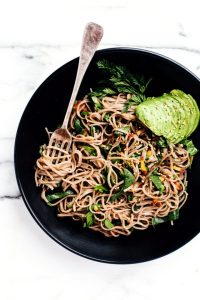
Soba Salad with Miso and Ginger-Glazed Eggplant and Broccoli
### Tasty Soba Noodle Stir-Fry with Eggplant
This delicious soba noodle stir-fry is an ideal choice for anyone in search of a speedy, healthy meal. Featuring a foundation of gluten-free soba noodles and an assortment of vegetables, this recipe is both fulfilling and amenable to different dietary needs.
#### Ingredients:
– Eggplant, chopped
– Soba noodles (ensure gluten-free labeling)
– Broccoli, sliced into thin pieces
– Green onion, roughly chopped
– Garlic, chopped finely
– Chili pepper, sliced
– Spinach
– Sesame seeds
– Fresh cilantro
– Olive oil
– Miso paste (for the marinade)
– Optional: Rice vinegar or lemon juice
#### Recipe Notes:
– **Vegetable Substitutions**: Should eggplant not be your preference, you can easily replace it with mushrooms or tofu.
– **Soba Noodles**: Crafted from buckwheat, soba noodles are inherently gluten-free. Nonetheless, always double-check the packaging, as some brands may include wheat with buckwheat.
– **Marinade**: The marinade used in this recipe contains no acidic components, but you may opt to include a dash of rice vinegar or lemon juice for added zest if you wish.
#### Instructions:
1. **Cook the Eggplant**: Heat a generously oiled pan over medium heat. Add the chopped eggplant with a sprinkle of salt. Sauté for 6-8 minutes, stirring intermittently to avoid sticking. Aim for a lovely color and a reduction in the size of the eggplant.
2. **Prepare the Marinade**: In a small bowl, combine the ingredients for the marinade. Miso can be tricky to dissolve; use the back of a teaspoon to mash it, then whisk until it reaches a smooth consistency.
3. **Cook the Soba Noodles**: Adhere to the package directions to prepare the soba noodles. Once ready, rinse them under cold water to eliminate excess starch, which will help prevent stickiness.
4. **Chop the Vegetables**: Slice the broccoli into thin pieces and roughly chop the green onion.
5. **Sauté the Vegetables**: After cooking the eggplant, transfer it to a bowl. In the same pan, add the broccoli, green onions, half a clove of garlic, and half of the chili pepper. Sear the broccoli for 1-2 minutes on each side.
6. **Combine Ingredients**: Place the cooked eggplant back in the pan and pour in half of the marinade. Mix thoroughly to combine.
7. **Incorporate Noodles and Spinach**: Add the soba noodles (beginning with 2/3 of them) and a handful of spinach. Remove from heat and toss all components together.
8. **Serve**: Dish the stir-fry into two bowls. Garnish with sesame seeds, fresh cilantro, the remaining chili, and a drizzle of the remaining marinade.
#### Enjoy!
This soba noodle stir-fry is not only quick to whip up but also brimming with flavor and nutrients. Ideal for a weeknight meal or a meal-prep option, it can be tailored to suit your taste preferences. Savor your culinary masterpiece!

Tasty Sautéed Bell Peppers and Onions Recipe
Here’s how to prepare sautéed peppers and onions: my technique yields soft, caramelized vegetables filled with delightful sweetness. This nutritious side dish is ready in only 15 minutes and complements everything from fajitas to sandwiches.
Searching for a wholesome and simple side? These sautéed peppers and onions create a vibrant array of tender, caramelized flavors! My usual choices were generally these fajita vegetables or grilled peppers and onions, until I encountered a “clean out the fridge” situation with a few bell peppers. Just sautéing them in a pan felt too easy…until I sampled them!
The sweet taste and tender consistency are genuinely irresistible! Even more enticing, they’re packed with nutrients and loaded with Vitamin C. Whether I’m serving them with grilled salmon or stuffing them in quesadillas, placing them on sandwiches, or using them on a pizza, they always vanish rapidly!
Ingredients for Sautéed Peppers and Onions
This sautéed peppers and onions recipe is ideal for when you have an abundance of bell peppers available. Ever purchased a pack of those assorted colored peppers and then forgot about them in the fridge? Here’s how to make use of them. You’ll need the following ingredients:
– 3 bell peppers: It’s great to use a range of colors, such as red, yellow, and green.
– 2 onions: Having a variety is helpful here too: I prefer using 1 red and 1 white.
– Olive oil: This nutritious oil is perfect for sautéing.
– Dried oregano: Seasoning with just salt and oregano may seem overly basic, but it truly lets the caramelized flavor of the peppers and onions shine.
How to Sauté Peppers and Onions
Sautéing is among the quickest methods to prepare vegetables! This technique for cooking browns the exterior of the food, aiding in the development of complex flavors (known as the Maillard reaction, if you wish to be technical!). The term sauté means “jump” in French, indicating you need to keep the food moving by stirring or flipping the pan. Here’s what you need to know about sautéing peppers and onions:
– Thinly slice the vegetables. The thinner the cuts, the quicker they will cook.
– Add the fat. You can use olive oil or butter for sautéing. Butter provides a richer, more savory taste.
– Cook on medium-high heat and stir occasionally. Ensure that the heat is not overly high.
– Cook until crisp-tender or very tender: you choose! You’ll need approximately 10 to 12 minutes for crisp tender and about 15 for very tender.
Seasoning Variations to Consider
While I appreciate the straightforwardness of just salt and oregano, there are numerous ways to personalize this recipe:
– Mexican or Tex-Mex: Incorporate 1 tablespoon of taco seasoning or fajita seasoning for a taste that’s ideal for tacos and burritos.
– Mediterranean: Complete with a sprinkle of dried basil, a squeeze of lemon juice, and a handful of fresh parsley.
– Italian: Add minced garlic in the last minute of cooking and finish with a drizzle of balsamic vinegar.
– Cajun: Utilize Cajun seasoning or blackened seasoning for a spicy twist that’s fantastic with seafood.
Ways to Serve Sautéed Peppers and Onions
So, you have the lovely rainbow pan of sautéed peppers and onions! How can you use them to round out a healthy dinner? There are countless ideas; here are some of my favorites:
Ingredient Spotlight: Bell Peppers
One of the reasons I strive to consume plenty of bell peppers is their nutrient density. Bell peppers are rich in Vitamin C – indeed, one serving of this recipe offers about 126% of your daily Vitamin C requirements! That’s more than most citrus fruits!
Bell peppers also contain a wealth of antioxidants, especially beta-carotene, which imparts color to red and yellow peppers. These antioxidants may assist in protecting against eye ailments and support overall immune health.
Storage and Reheating Tips
These sautéed peppers and onions store effectively in the refrigerator for up to 5 days. I keep them in an airtight container and reheat them in a skillet over medium heat. You can also warm them in the microwave, but I prefer the skillet method as it helps preserve their texture better.
Dietary Notes
This sautéed pepper and onion recipe is vegetarian, vegan, plant-based, dairy-free, and gluten-free.
Frequently Asked Questions
Can I prepare these in advance for meal prep? Yes! These are one of my preferred meal prep ingredients. Create a large batch at the week’s start and incorporate them in various ways throughout the week. They work well in baked quesadillas, vegetarian pasta dishes, and a multitude of other meals.
Can I include fajita seasoning? Yes! I like to mix in 1 to 1.5 tablespoons of fajita seasoning or 2 teaspoons of cumin, 1 teaspoon of chili powder, 1 teaspoon of garlic powder, and 1 teaspoon of smoked
Read More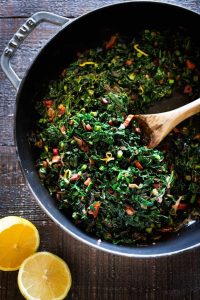
Easy and Fast Sautéed Kale Recipe
### Discovering Your Kale Choices: A Guide to Selecting the Perfect Type for Your Meal
Kale, a highly nutritious leafy green, has gained popularity in various kitchens due to its adaptability and health advantages. When purchasing kale, it’s crucial to recognize the different types available and how they can be effectively incorporated into your culinary creations. Here’s a guide to assist you in making educated selections when choosing kale for your dishes.
#### Curly Kale
Curly kale is arguably the most prevalent type found in supermarkets. It possesses a strong, slightly bitter taste that can be softened with the addition of citrus or apple cider vinegar. When sautéing curly kale, think about sprinkling some Parmesan cheese after cooking to elevate its flavor. This type is perfect for robust dishes where its texture and taste can complement other bold ingredients.
#### Red Kale
Red kale, akin in flavor to curly kale, is characterized by its reddish leaves and stems. It can be substituted in recipes where curly kale is suggested. The bright hue of red kale can enhance the presentation of your plates, making it an excellent option for salads and garnishes. Similar to curly kale, it benefits from the inclusion of acidic components to counterbalance its bitterness.
#### Baby Kale
Baby kale is the tender, young form of mature kale varieties. Its gentle taste and soft texture make it a fantastic choice for salads, where it can be blended with other greens for a refreshing, lightweight dish. Baby kale is also a great addition to dips, such as spinach artichoke dip, where its mild flavor complements other tastes without dominating them.
### Cooking Suggestions
– **Sautéing:** For curly and red kale, sautéing is a favored technique. Warm a bit of olive oil in a skillet, add the kale, and cook until it wilts. Finish with a dash of citrus juice or apple cider vinegar and a sprinkle of Parmesan for extra flavor.
– **Salads:** Utilize baby kale raw in salads. Its tender leaves need no cooking and pair wonderfully with a range of dressings and toppings.
– **Dips:** Add baby kale to creamy dips for an extra nutritional boost without significantly altering the flavor profile.
### Summary
With its diverse flavors and textures, kale is a flexible ingredient that can be adapted to various culinary uses. Whether you enjoy the bold flavor of curly and red kale or the mild taste of baby kale, knowing how to employ each type can elevate your cooking and enable you to create tasty, nutritious meals.
Read More